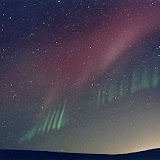
Kalamalka Lake Eclipse

Credit & Copyright: Yuichi Takasaka
Click picture to go to NASA APOD site for full explanation
Lunation

Credit & Copyright: António Cidadão
Click picture to go to NASA APOD site for full explanation
The Colorful Clouds of Rho Ophiuchi

Credit: Adam Block, KPNO Visitor Program, NOAO, AURA, NSF
Click picture to go to NASA APOD site for full explanation
A Path Into Victoria Crater

Credit: Mars Exploration Rover Mission, Cornell, JPL, NASA; Acknowledgement: Eduardo Tesheiner
Click picture to go to NASA APOD site for full explanation
Aurigids from 47,000 Feet

Credit: Jeremie Vaubaillon, Caltech, NASA
Click picture to go to NASA APOD site for full explanation
Time Tunnel

Credit & Copyright: Johannes Schedler (Panther Observatory); Additional Image Data: Ken Crawford (Rancho Del Sol Observatory)
Click picture to go to NASA APOD site for full explanation
South Pole Lunar Eclipse

Credit & Copyright: Robert Schwarz (South Pole Station)
Click picture to go to NASA APOD site for full explanation
The Voyagers' Message in a Bottle

Credit: Voyager Project, JPL, NASA
Click picture to go to NASA APOD site for full explanation
The Great Basin on Saturn's Tethys

Credit: Cassini Imaging Team, SSI, JPL, ESA, NASA
Click picture to go to NASA APOD site for full explanation
Building Galaxies in the Early Universe

Credit: NASA, ESA, and N. Pirzkal (STScI/ESA) et al.
Click picture to go to NASA APOD site for full explanation
A Scorpius Sky Spectacular

Credit & Copyright: Stéphane Guisard
Click picture to go to NASA APOD site for full explanation
Six Rainbows Across Norway

Credit & Copyright: Terje O. Nordvik
Click picture to go to NASA APOD site for full explanation
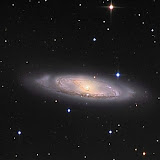
NGC 7129 and NGC 7142

Credit & Copyright: Tony Hallas
Click picture to go to NASA APOD site for full explanation
Iapetus in Black and White

Credit: Cassini Imaging Team, SSI, JPL, ESA, NASA
Click picture to go to NASA APOD site for full explanation
Iapetus: 3D Equatorial Ridge

Credit: Cassini Imaging Team, SSI, JPL, ESA, NASA; Stereo Anaglyph: Patrick Vantuyne
Click picture to go to NASA APOD site for full explanation
To Fly Free in Space

Credit: STS-41B, NASA
Click picture to go to NASA APOD site for full explanation
Inside Victoria Crater on Mars

Credit: Mars Exploration Rover Mission, Cornell, JPL, NASA
Click picture to go to NASA APOD site for full explanation
Tungurahua Erupts

Credit & Copyright: Patrick Taschler
Click picture to go to NASA APOD site for full explanation
4,000 Kilometers Above Saturn's Iapetus

Credit: Cassini Imaging Team, SSI, JPL, ESA, NASA
Click picture to go to NASA APOD site for full explanation
Northern Cygnus

Credit & Copyright: Robert Gendler
Click picture to go to NASA APOD site for full explanation
Coronet in the Southern Crown

Credit: X-ray: NASA/ CXC/CfA/ J.Forbrich et al.; Infrared: NASA/ SSC/CfA/IRAC GTO Team
Click picture to go to NASA APOD site for full explanation
Pangea Ultima: Earth in 250 Million Years?

Credit & Copyright: C. R. Scotese (U. Texas at Arlington), PALEOMAP
Click picture to go to NASA APOD site for full explanation
The Equal Night

Credit: STS-68 Crew, NASA
Click picture to go to NASA APOD site for full explanation
A Galactic Star Forming Region in Infrared

Credit: S. Carey (SSC/Caltech), JPL-Caltech, NASA
Click picture to go to NASA APOD site for full explanation
Zodiacal Light and the False Dawn

Credit & Copyright: Yuri Beletsky (ESO)
Click picture to go to NASA APOD site for full explanation
Saguaro Moon

Credit & Copyright: Stefan Seip (Astro Meeting)
Click picture to go to NASA APOD site for full explanation
Hole in the Sun

Credit: SOHO - EIT Consortium, ESA, NASA
Click picture to go to NASA APOD site for full explanation
A Hole in Mars Close Up

Credit: HiRISE, MRO, LPL (U. Arizona), NASA
Click picture to go to NASA APOD site for full explanation
Dawn Launch Mosaic

Credit & Copyright: Randy Pollock
Click picture to go to NASA APOD site for full explanation
A Milky Way Band

Credit & Copyright: John P. Gleason, Celestial Images
Click picture to go to NASA APOD site for full explanation


No comments:
Post a Comment